

Adulting
The FICO Score Scam
How A Three Digit Number Hijacked Your Financial Life

Erik Richter
December 3, 2025
A brutally honest, one-stop guide for first-time indie authors or anyone who want to know what it actually takes.

Let’s start here: Writing the book was the easiest part.
I didn’t say “easy,” just “easiest.”
Compared to what came next—editing, format hell, cover design, a slow spiral of doubt, printing logistics, Amazon’s black box, and shipping 200+ hardcovers wrapped like historical artifacts—it was practically recess.
But this post isn’t a rant (okay, it’s a little bit of a rant). It’s a behind-the-scenes look at what really went into getting my debut novel, The Portrait of Eloise Leclair, into readers’ hands without losing my mind or my shirt ("r" optional).
I also want to be clear up front: this post is all about the self-publishing process. How I went from an outline to holding my own hardcover novel in my hands. I’ll cover the tools, steps, and chaos that got me there, from formatting to distribution to mailing preorders.
I chose to self-publish because I wanted full creative control—over the story, the design, the timeline, and the reader experience. Traditional publishing has its merits, but waiting years for someone else’s greenlight didn’t appeal to me. I believed in the book, so I built the path to release it myself.
If you're looking for a deep dive into the story behind the story, the historical inspirations, the real-life events that shaped the plot, and my writing process, I’m saving all of that for a separate blog post.
This one is for the self-pub nerds. The indie authors. The people who want to know how the sausage gets made.
It’s long. But you can bookmark it and jump around with this handy table of contents:
Before there was a book, there was a mess of thoughts.
I started The Portrait of Eloise Leclair not with a formal outline or a plot bible, but with a digital mind map. The app I used was MindNode, a visual outlining tool that let me birth a whole bunch of one-sentence story ideas into existence.
At first, they were nothing more than high-level blurbs: character moments, plot turns, ideas I wanted to explore. I didn’t know where they belonged yet. I just knew they mattered.
Once I had that brain dump, I zoomed in on each point. Each sentence expanded into a paragraph. Paragraphs became miniature chapters. I wasn’t just outlining. I was sketching the architecture of the novel.
Timelines, characters, plot elements, and order.
And once that scaffolding felt strong enough, I moved everything into Ulysses, my go-to writing app.
Ulysses is where the actual drafting happened. It’s distraction-free, well-organized, and allowed me to keep chapters structured like modular building blocks. I could jump between timelines, character arcs, and themes without losing my place OR my mind.
The app became my command center.
But, as every writer knows, a “finished” first draft is really just the beginning.
So I hit “export,” loaded it onto my Kindle, and braced myself for what came next.
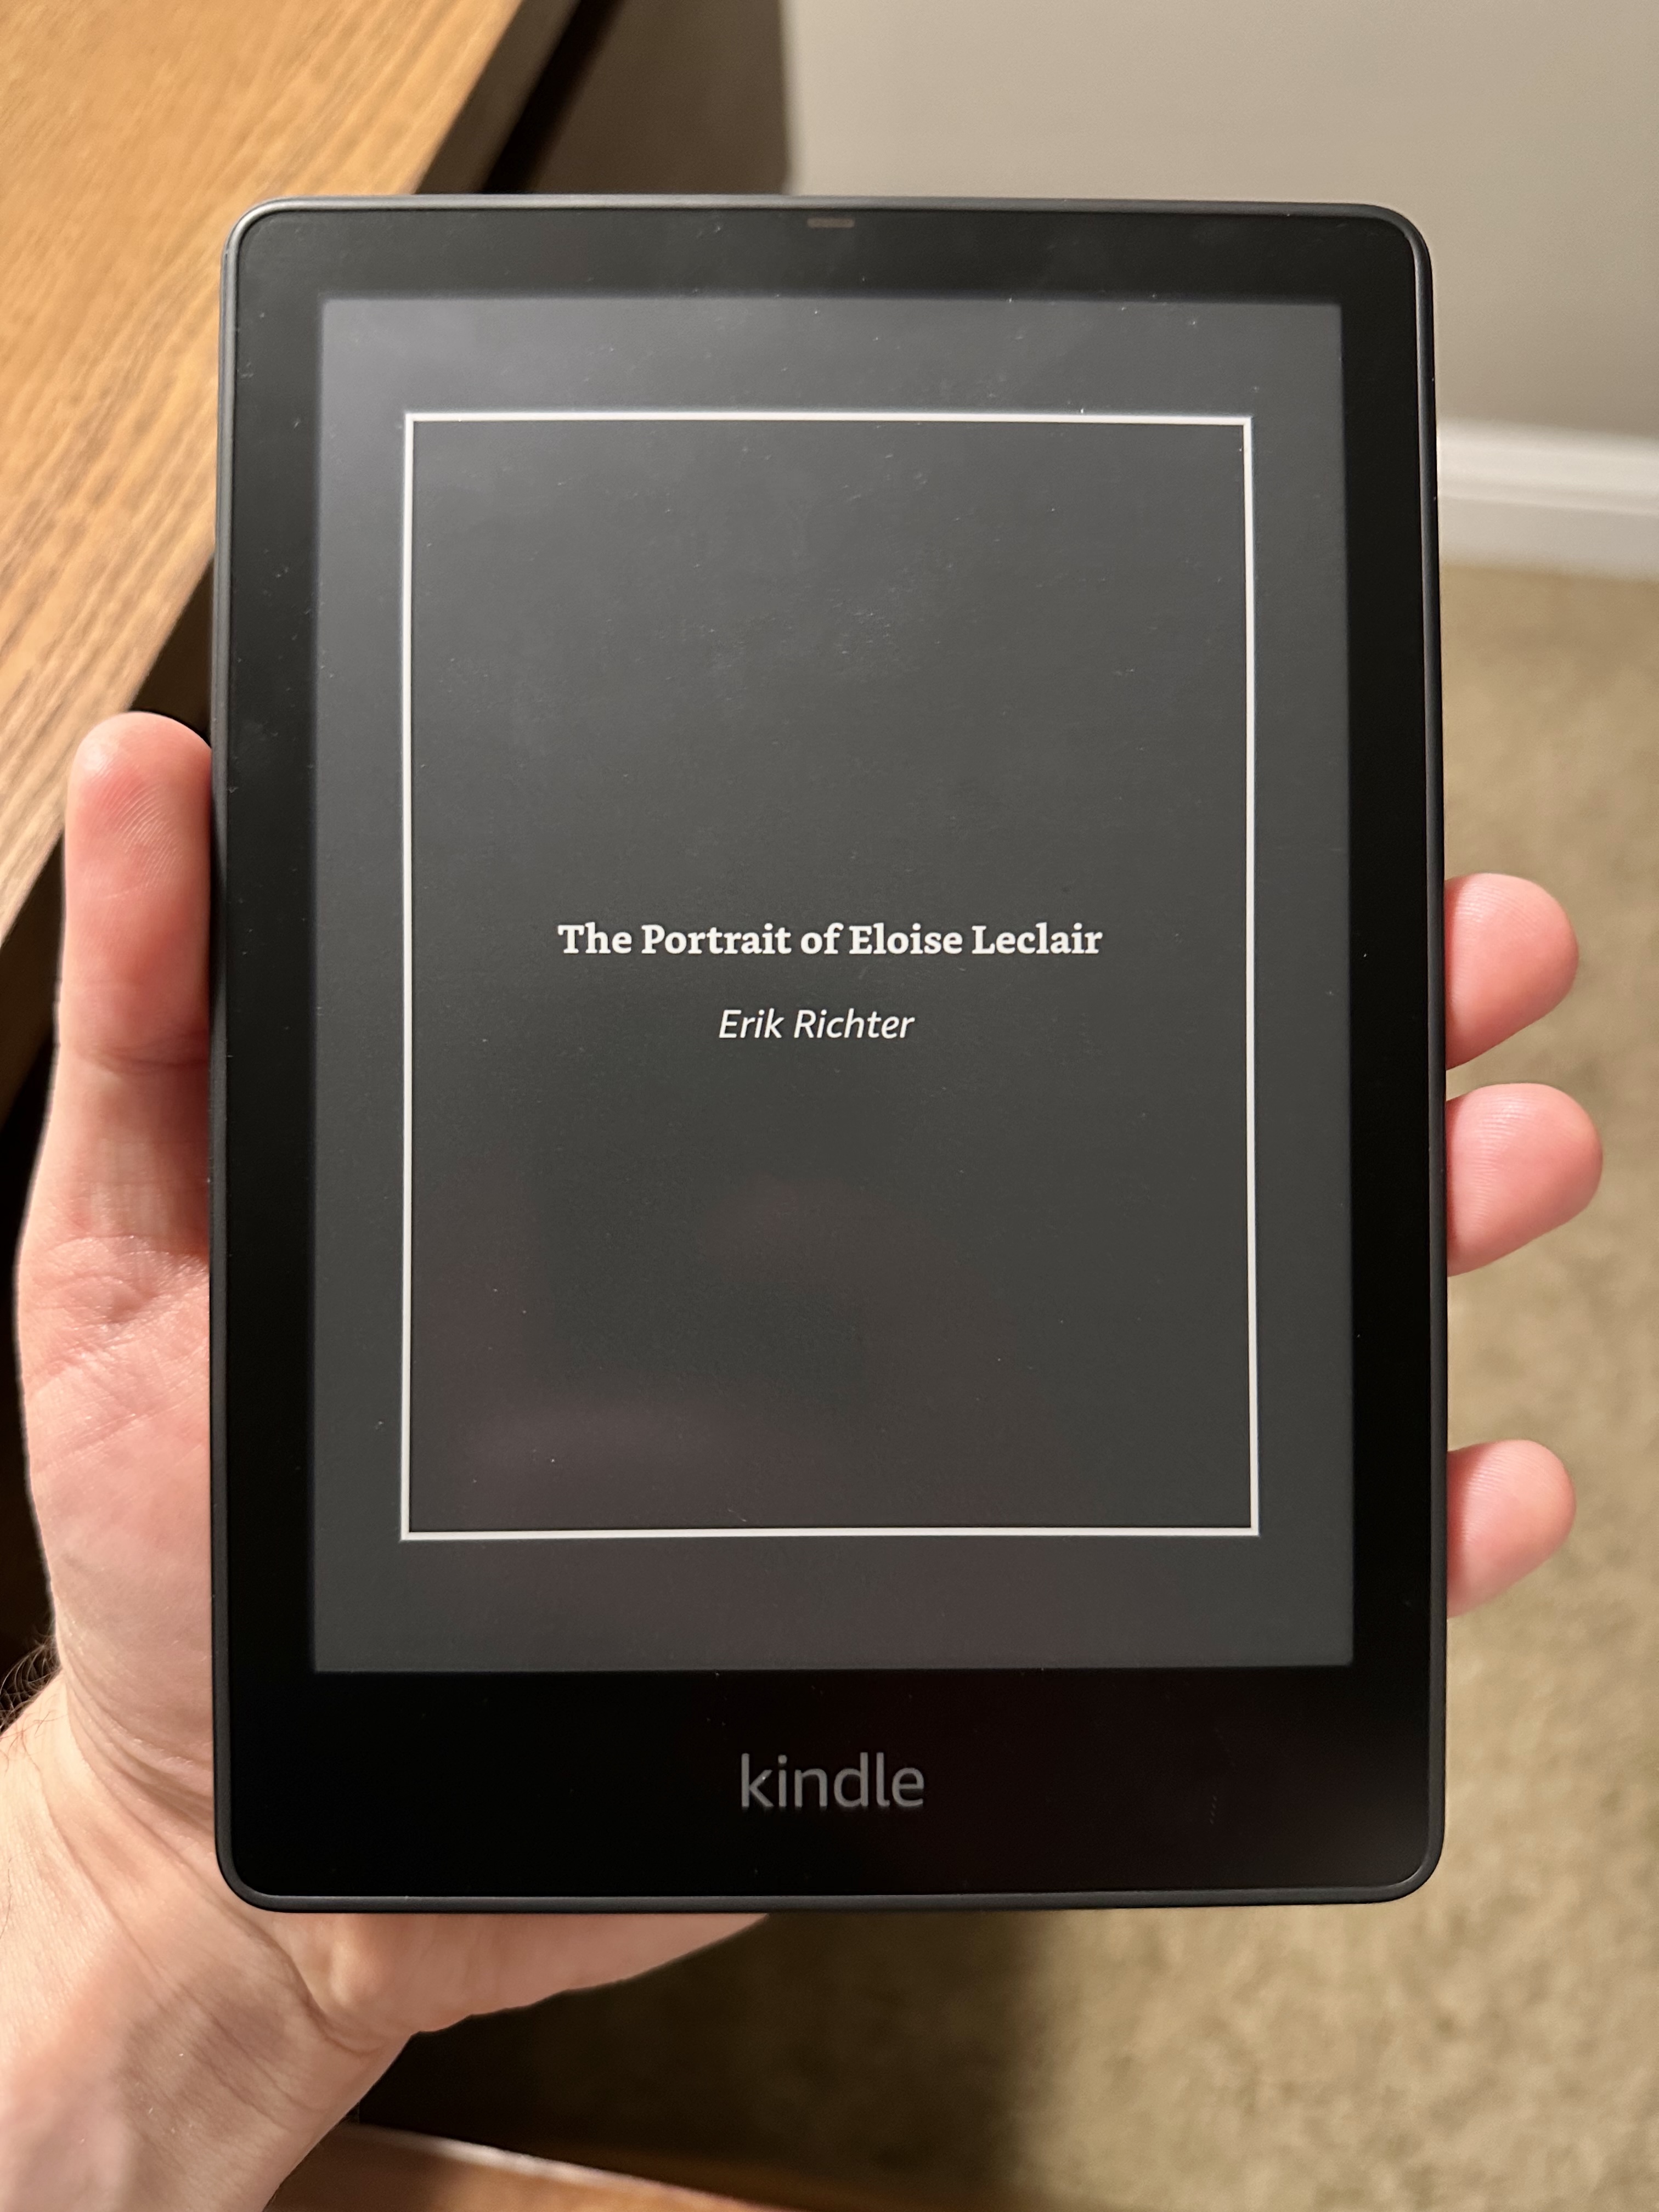
With the first draft exported to Kindle, I decided to try something I hadn’t done before: I read the entire thing out loud to my wife.
Every. Single. Word.
Here’s why that was one of the best decisions I made in the entire self-publishing process, and why I’d now recommend it to literally everyone who will listen:
So yes, reading the entire thing out loud took time. It was exhausting. My vocal cords were staging a rebellion by chapter 18. But it was easily one of the most valuable revisions I did. It brought the story out of my head and into the world where it could be heard, questioned, and ultimately improved.
And as for Laura? She didn’t just support me. This wasn’t a passive “read and smile” situation. She helped shape the story.
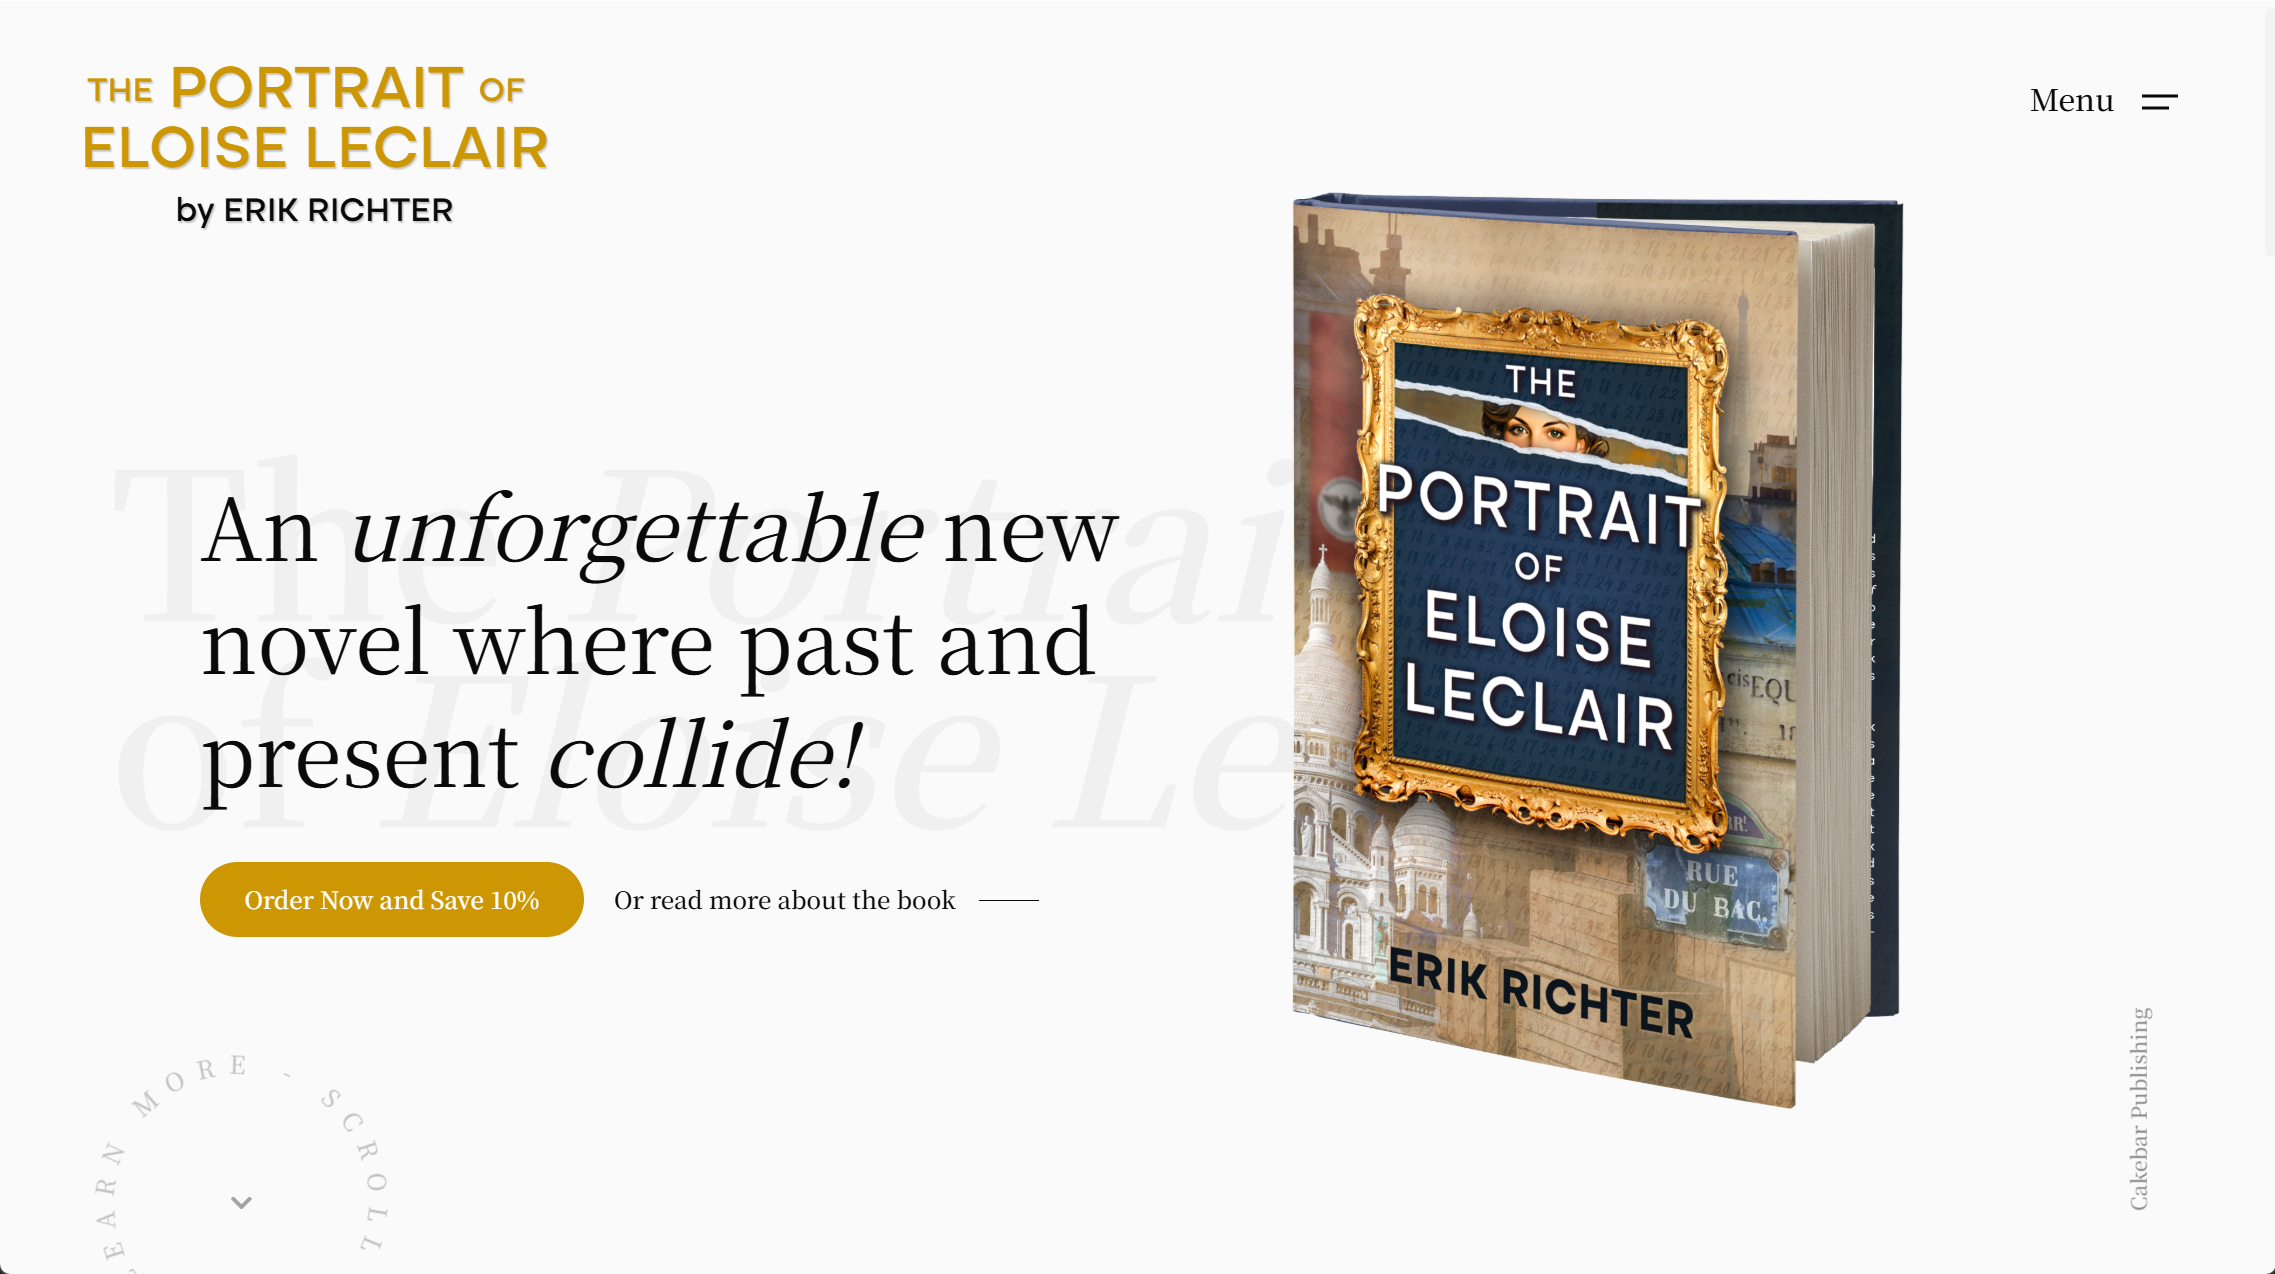
Once I was knee-deep in revisions and just starting to feel like The Portrait of Eloise Leclair might actually become a real book, I did something slightly out of order: I built the website.
Why?
Because while most authors wait until the book is finished, I knew early on that the website would be critical, not just for future sales, but for capturing emails, distributing digital ARCs, and giving the project a professional face before it ever hit the shelves.
Also… I’m a software engineer, and this kind of thing is my idea of fun.
And let’s also be honest. I needed a freaking break from editing.
Custom-built and coded to visually mirror the themes of the story, the site became a beautiful digital headquarters for the book. It included:
I made the email required. If someone wanted to download the free digital ARC, they had to give me their email address first. That wasn’t just a marketing move. It was logistical. I set it up so every email automatically dropped into my personal admin dashboard which I could use to track who downloaded what, follow up, and organize feedback.
No problem. A simpler site like this could be made just as easily using a no-code builder like Squarespace, Wix, or even a Mailchimp landing page. The point isn’t how you build it. It’s that you build it. If you want readers, you need to give your book a front door.
Launching the website while still deep in revisions gave me confidence. It made the book feel real. It gave me something tangible to show people. I wasn’t just saying “I’m working on a novel.” I had a title, a landing page, and a way to get it in readers’ hands (even if those hands were mostly friends and family at that stage).
And it gave me a natural reason to start talking about the book online. “Hey, check out my site” sounds a lot more put-together than “Hey, I’m vaguely writing something that might exist someday.”
Bottom line: the site wasn’t just for show. It was functional, strategic, and gave me the infrastructure to start building my ARC team, collecting feedback, and preparing for launch, before I had even finished Draft 6.
After Laura and I finished our read-through and I’d made another-round pass to tighten things up, it was time to bring in more voices. Enter the ARC phase.
If you’re unfamiliar, ARC stands for “Advance Reader Copy”—essentially, a not-quite-final version of your book that you give to early readers in exchange for feedback. Some authors use ARCs purely for blurb-collecting or early reviews. But as my own publishing team I was looking for something more critical: real editorial help.
Here’s how I tried to find them… and what actually worked.
I’m fairly active on Reddit, and I figured it might be a goldmine for finding readers. I posted to several self-publishing and reading subreddits offering free copies of the book (via my newly built site) in exchange for feedback.
The good news? People downloaded it. Lots of people.
The bad news? Only a handful actually gave meaningful feedback. Many ghosted me completely.
Still, a few Reddit strangers came through with surprisingly thoughtful notes. So I count it as a partial win, especially when it produced one of my first early reader review quotes that is still featured on the back cover!
But I learned quickly that “free book” doesn’t equal “engaged beta reader.” Lesson: lower your expectations and cherish the few gems.
Laura is in a book club of about 15 women, and we decided to pitch the book to them. To my surprise, 8–10 of them actually read it!
Even better? Three of them delivered meticulous, borderline copyeditor-level notes. One in particular might be part-human, part-grammar-bot. She caught typos no one else did. These women helped me refine phrasing, tighten pacing, and improve clarity in key scenes.
Book clubs, it turns out, are filled with engaged, thoughtful readers who love having opinions. Use that.
I also put out a call to family and friends. You’d think this would be hit-or-miss, and it kind of was. But one person shocked me with just how good her feedback was: my sister.
She reads a ton, and she came back with notes that were as sharp as any developmental editor. She spotted repetition, pointed out sagging sections, and helped me restructure several scenes for better narrative rhythm. It was like having a built-in story consultant.
Between Laura, the book club, my sister, Reddit readers, and a few trusted friends, I ended up with around 30 ARC readers—people who actually read and sent back thoughtful, constructive feedback.
The ARC phase stretched about three months, and I spent that time chasing down reader feedback and patching holes in the manuscript. I tried to be fancy about it at first. I built a whole SurveyMonkey questionnaire like some kind of professional researcher. Total waste of time. Hardly anyone used it.
Turns out, readers are more than willing to just shoot you an email or DM with their thoughts, often at midnight, usually unprompted. My inbox became a dumping ground of half-formed notes, typo screenshots, and the occasional “Wait, who is this character again?”
Keeping track of it all was chaos. I had highlights in Kindle, notes in Ulysses, random Gmail threads, and musings on digital Post-its. I even had to juggle different ARC versions. None of it matched. It was a mess.
Some days I thought the draft was never going to feel "good enough." I’d stare at feedback that contradicted itself, wonder which direction to take, and sometimes just freeze.
But here’s the thing: the madness still worked. Somehow, cross-referencing scraps of feedback and duct-taping them into a system actually got the job done.
Messy? Absolutely. But manageable enough to keep the book moving forward? [deep breath in, eyes squinting] Yeah.
Also, Laura didn’t stop helping once her read-aloud session ended. She kept giving notes. New ideas. Better transitions. Whole conversations about how to make a plot beat feel more earned. During this phase, she wasn’t just supportive. She was a co-editor. Her fingerprints are all over the book.
And, most importantly, it gave me momentum. With each round of feedback, the book didn’t just improve technically—it became something people wanted to keep reading. More engaging. More cohesive. Less "first-time author" and more "this could be something."
That feedback even influenced the title. What I thought would be just my ARC working title ended up becoming the actual title, thankfully, because readers liked it. Even though it was on the longer side, the length turned out to be an advantage. A longer title boosts visibility in search engines, makes it more memorable, and yes, even plays nice with Amazon’s algorithm.
It’s like telling someone to meet at 11 a.m. versus 11:03. The oddly specific time sticks in memory. My title worked the same way.
My first draft had roughly 165,000 words. My final draft, 143,000, clocking in at 456 pages. I cut out 73 additional pages. That’s editing.
If I went the trad publishing route (how the cool kids say “traditional publishing”), I would have had someone doing this for me. But I needed to do it myself.
There were times I couldn’t read another line of my work. I edited one paragraph 17 times just to get it right.
It was exhausting. It wore me down. But it made the book evolve from a manuscript into a novel.

You know the saying, “Don’t judge a book by its cover”? Yeah. Readers ignore that entirely. So did I.
Because let’s be honest, when you’re self-publishing, your cover is your handshake. Your introduction. Your “Hello, nice to meet you, please take me seriously even though I’m not from a Big Five publisher.”
Which is why I obsessed over mine. For weeks. Months. Possibly to an unhealthy degree.
But if you saw where my cover started to where it is today, you’d say it was worth it. At least… I would.
Growing up, I was enamored with the movie posters of the ’80s and ’90s. Indiana Jones, Star Wars, Back to the Future. They weren’t just images; they were mini-narratives filled with action, and mystery, and mood. And almost all of them were painted by the same guy: Drew Struzan.
I didn’t know his name back then, but I knew the feeling his posters gave me. So when it came time to design the cover of The Portrait of Eloise Leclair, I went full nostalgia-mode. I wanted something that felt like a modern-day historical suspense and paid homage to those epic, hand-crafted collage artworks.
Not an easy task.
I knew I wanted to include period imagery and symbols from WWII in the cover. It was important to ground the visual tone in the actual history behind the story. Early on, some of my drafts even included a swastika flag—historically accurate, contextually justified, and visually striking.
But the more I sat with it, the more certain I became: I couldn’t do it.
Yes, the swastika is accurate. But it’s also a symbol of hatred, violence, and deep generational trauma. And even though its inclusion made sense from a purely historical standpoint, I didn’t want that symbol to be the first thing someone saw when they picked up my book.
So I made a deliberate change.
Instead of the swastika, I used the Reichsadler, the eagle emblem used by the regime during that era. It still evokes time and place and signals power, but without the same grotesque associations. It lets the story speak for itself without alienating readers or sensationalizing the trauma that underlies the plot.
It was a small design shift, but an important one. One that reflects the deeper care I tried to bring to the entire process.
Everything in the artwork had purpose. From architectural details to the composition of the dual timelines, I wanted the cover to reflect the story’s historical weight and its emotional tension. The modern timeline is mirrored subtly in the modern font style. There’s visual balance between past and present. It’s not just a pretty picture. It’s layered. Just like the book.
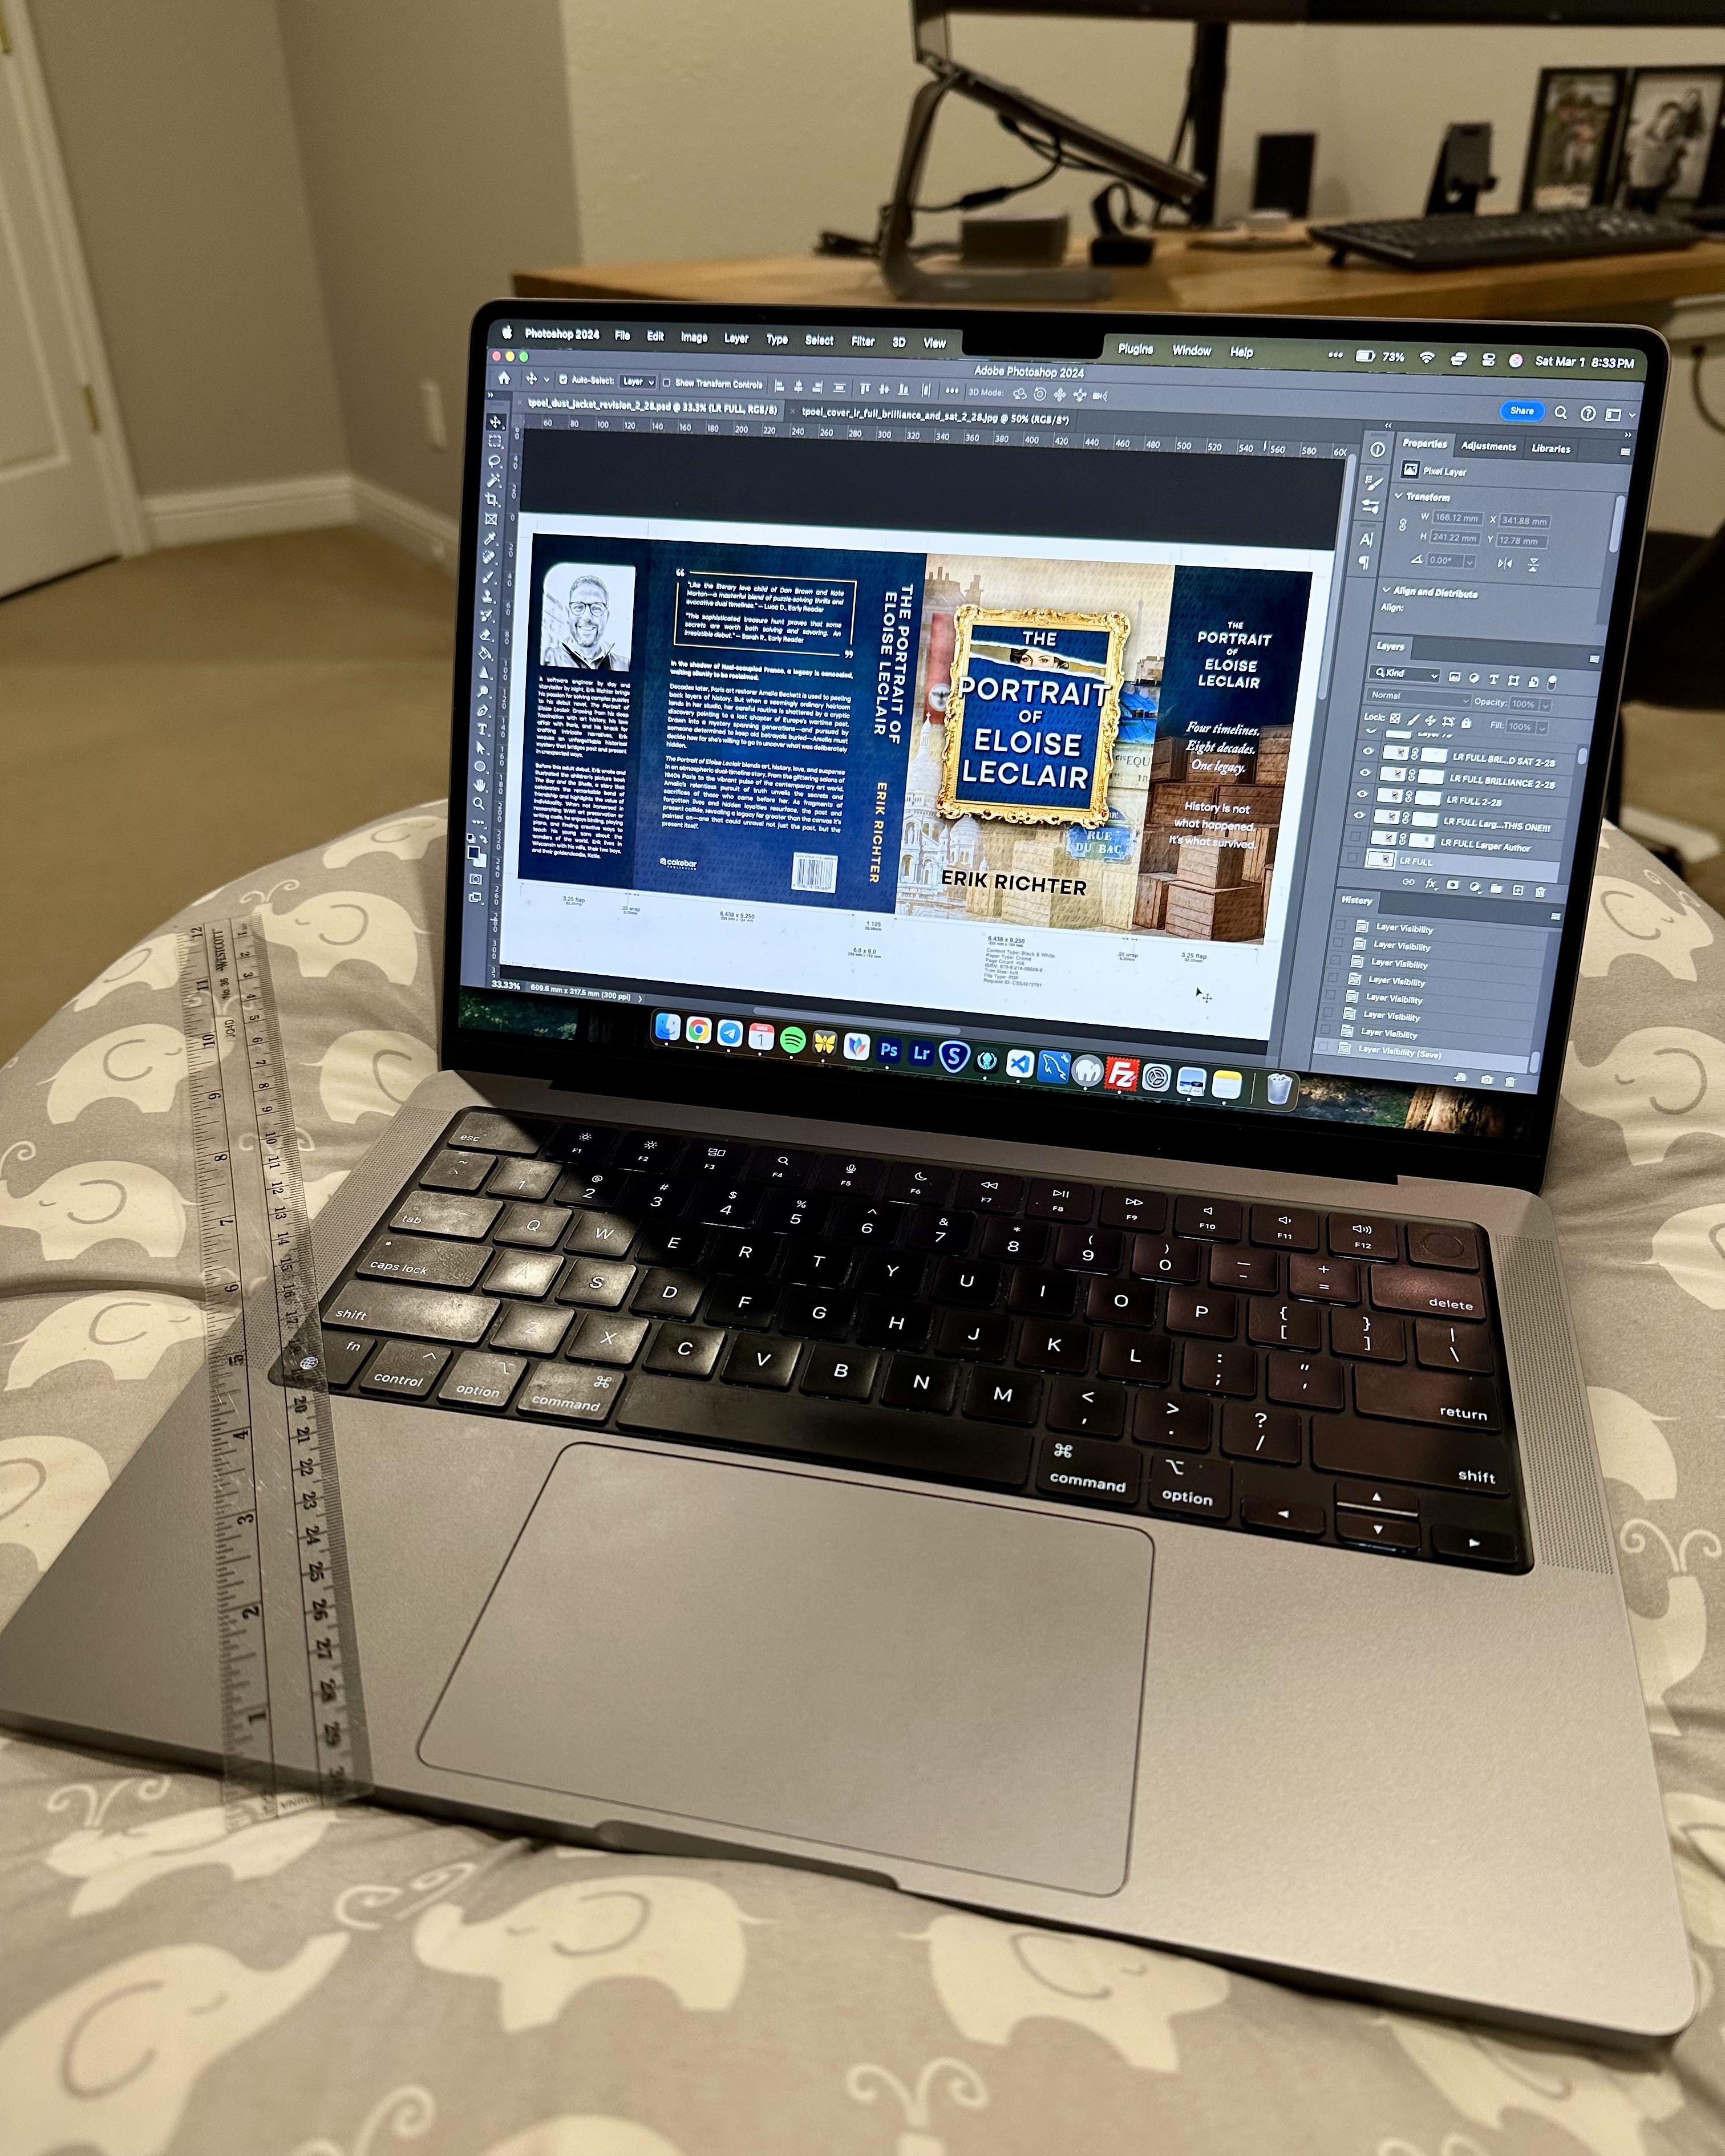
No exaggeration. I went through ten complete revisions of the cover before I landed on the final version.
I’d think I had it… then something would start to bug me. A typeface that felt wrong. A contrast ratio that didn’t hold up in grayscale. A visual element that clashed with the tone of the story.
I even nearly went with a cover that looked like a cheesy romance novel [facepalm].
And designing for both digital and print added another level of complexity. The digital version had to look good on tiny thumbnails and grayscale Kindles, while the print version needed to hold up in full matte finish on a hardcover dust jacket. I even had to adjust contrast and color saturation differently depending on the format.
And yes, I used Photoshop and InDesign, because I already had the Adobe Creative Suite through my app development company, Cakebar. But honestly? You don’t need high-end tools to do this well. You just need time, obsession, and a willingness to iterate until your eyeballs hurt.
By the time I hit “export” on the final cover file, I was bleary-eyed, slightly twitchy, and 87% sure I never wanted to see another font pairing again. But I was also thrilled. The finished cover didn’t scream “self-published.” It looked like something you’d pick up off a table at a real bookstore and think: Whoa. What’s this about?
That’s exactly what I wanted.

Once the manuscript was locked in and the cover was finally behaving, I turned my attention to the next mountain: formatting.
If writing the book was the joyful creative sprint, formatting was the part where I fell into a pit of margin calculations, font testing, and unexpected page numbering crises. And yes, I had to learn what a “gutter margin” is.
Let’s break it down.
I knew I wanted to offer my book in three formats:
Traditionally, hardcovers are printed at 6"x9", so that was a no-brainer. But paperbacks? Usually smaller. I considered doing two separate sizes to match industry norms, but then I remembered something crucial: I’m a self-published author. I do not have time to track two formats. So I decided to make the paperback 6x9 as well. This was a slightly unconventional choice, but one I ended up loving. It gave the paperback a more premium, intentional feel.
This is the part most people gloss over… until they get a proof copy that looks like a high school term paper.
I didn’t want that.
So I took a week (okay, two weeks) and ran an A/B test on fonts. Yes, I tested out multiple typefaces and font sizes on real paper to see how they read. I ultimately went with Baskerville, a beautiful, readable serif that’s classy without being fussy. Bonus: it’s open source, so no licensing issues.
Margins are… tricky.
You’d think you could just set all four to 3/4-inch and call it a day. But no. Binding eats space.
I learned (the hard way) that the inside margin (next to the spine) needs to be larger than the outside one, otherwise the text gets swallowed by the binding. It’s called the gutter, and if you ignore it, your beautifully formatted text ends up awkwardly glued into the book’s spine, forcing readers to pry it open like they’re cracking a lobster.
So I fiddled. I iterated. I printed proofs. I adjusted the gutter margin by a few millimeters at a time until the text finally sat perfectly centered.
While I was at it, I added:
Because yes, you need that stuff. It’s part of what makes a self-published book feel real.
EPUB formatting was actually easier. No headers or footers. No margin stress. Just a clean, flowing design that worked well on e-readers.
In Ulysses, I used one of their built-in templates as a starting point, then customized it with CSS, which Ulysses thankfully supports. I adjusted font styles, chapter titles, spacing, and part breaks until it looked good on both Kindle and Apple Books. (Yes, I tested both. Yes, I went down that rabbit hole too.)
Fun fact: I also had to tweak the digital cover. E-readers display everything in grayscale, so I increased contrast and adjusted colors to maintain clarity when the full-color design got turned into a foggy gray mess.
This was my mantra. Just because I self-published doesn’t mean I wanted the book to scream “I made this in Word.”
So I sweated the details. I obsessed over white space. I printed proofs until the spine text landed exactly where it should.
The result? A book that feels like it came from a traditional press. One that readers hold and say, “Wait… you did this yourself?”
Yes. Yes, I did.
Let’s talk printing. Or more specifically, how to get your beautiful, perfectly formatted, lovingly revised book into the hands of readers through a system designed to make sure you profit last.
I’d already committed to three formats.
What I didn’t know was just how complicated that decision would get once Amazon entered the picture.
I’d used IngramSpark before, back when I wrote, illustrated, and self-published my children’s book The Boy and the Shells, so I was already familiar with their setup. More importantly, they offered something Amazon didn’t:
A quality hardcover with a dust jacket and matte finish.
That might seem small, but for a book priced at $35.99 (more on this soon), I needed it to look like it deserved the price. A dust jacket, spine printing, and premium stock elevate a hardcover from “self-pub curiosity” to “legit bookstore shelf.”
Amazon’s hardcovers, on the other hand, are case laminate only—basically a glossy wrap glued to the board. It feels cheap. And at this price point, cheap is not an option.
So IngramSpark it was.
They also offer global distribution, meaning they can list your book with online retailers and bookstores worldwide. But there’s a catch. Actually, several.
Here’s how it works when someone buys my hardcover in a big box store or on Amazon:
End result: for each $35.99 hardcover sold on Amazon, I make $1.92.
Let that sink in.
I wrote it. Designed it. Edited it. Marketed it. Sold it.
And I walk away with enough to buy a gas station coffee. Maybe... If it’s a latte, I’m in the red.
There were moments when IngramSpark’s fees hit so hard I half-wondered if I should just skip the printing and light dollar bills on fire in my driveway instead. At least that would’ve been warmer.
And here’s the kicker: most hardcovers in bookstores sell for $25-$30. Big publishers can do that because of volume and sweetheart distribution deals. If I tried pricing mine that low, I’d literally owe money every time someone bought a copy.
Here’s the deal with Amazon: they don’t like or play well with outsiders.
If your book isn’t printed through Amazon KDP (Kindle Direct Publishing (their print-on-demand service)), they’ll still list it on their site (thanks to IngramSpark distribution), but they’ll treat it like a second-class citizen.
Examples:
Why? Because Amazon doesn’t make much money on IngramSpark-printed books. But they do make money when you use KDP. So they quietly punish anything else.
To make Amazon work for me, I had to play by their rules, without compromising quality.
So I came up with this:
This allowed me to stay in Amazon’s ecosystem for discoverability… while still offering a premium hardcover for people who cared about the tactile side of reading.
I also chose not to enable expanded distribution for the KDP paperback, because the margins were even worse and no one’s going to pay $20 for a paperback, which is what I needed to price it at if Amazon distributed it. If a bookstore wants to carry the book, they’ll get the hardcover through IS or do it through consignment (which I’ll cover in a later section).
As a sidenote, publishing through KDP also allows authors to create that fun "A+ Content" (shown as "From the Publisher" on your book listing page) for an additional marketing boost.
Uploading to KDP also allowed me to make a Kindle version, which opened the door to:
There's a catch, though: if you enroll in Kindle Unlimited, you get amazing visibility (and free advertising) on Amazon, but you’re banned from selling your digital version anywhere else while it’s active. No Apple Books, no Kobo, no direct sales on your site.
I didn’t love that… but I understood it. Amazon is a monopoly because we let it be. But as a self-published author, visibility is survival. And KU gave me access to thousands of new readers who wouldn’t have found me otherwise.
So I held my nose and enrolled.
Two months in, I’ve had over 500 downloads, and the royalties per copy are only slightly less than a direct ebook sale. Compare that to the four digital copies I sold on my own site in the same window...
It was, unfortunately, a smart decision.
The $1.92 royalty per hardcover? Not going to cut it.
That’s why I also order my books at print cost, in bulk, and sell them myself through my website. No middlemen. No wholesale discounts. By doing this, I can offer:
I also sell through author events and local bookstores on consignment, where both I and the store make more money. It’s more work, sure. But it’s more rewarding in every possible sense. I like to support local where I can.

Printing may trip up a lot of first-time authors. But if you’re willing to learn the system, know your numbers, and accept that Amazon is both your enemy and your enabler… you can make it work.
Even if you only walk away with $1.92.
After the formatting stress and Amazon politics, it was time to shift gears. My final manuscript draft was locked. My files were exported. The cover was done. The print logistics were in motion.
Which meant:
It was go time.
Time to get this book into readers’ hands, not as a concept, but as a thing. A holdable, flip-throughable, smells-like-a-book thing. And I knew I wanted to launch with a bang. So I doubled down on something that often gets overlooked in the self-publishing world:
The experience.
I did this by:
Once I had my final versions ready, I transitioned my website from ARC mode to preorder mode. The site now led with a call-to-action for people to preorder signed hardcovers directly from me, not from Amazon.
This allowed me to:
I also added one page that’s easy to overlook—but turned out to be crucial:
This page became my book’s elevator pitch in digital form. It included my author photo and bio, the book cover, blurb, genre description, vitals, historical background, comp titles, and a bulleted list of key talking points—everything a bookseller, blogger, or bookstagrammer might need to quickly understand or promote the book.
And because people love free stuff, I added a download section: a printable shelf talker, store sell sheet, cinematic book trailer, book club discussion guide, custom phone wallpaper, and a PDF preview of the first four chapters.
This page turned out to be a game-changer, especially when pitching to bookstores. It gave them exactly what they needed, no digging required.
Side note: I put together the Book Club Guide with thoughtful questions meant to spark discussion, because I wanted to give clubs a real reason to pick it up... and it worked.
I used these and a mix of Instagram, Reddit, Facebook, and word of mouth to drive preorder traffic.
I’ll be honest, this was NOT my favorite part. I hate marketing. Social media captions make my soul wilt. I wrote and deleted the same “please preorder my book” post a ridiculous amount of times.
One caption attempt literally drove me to avoid my phone for the rest of the day.
But I pushed through, and so did Laura who stepped in as my marketing support team, hype woman, and part-time copywriter.
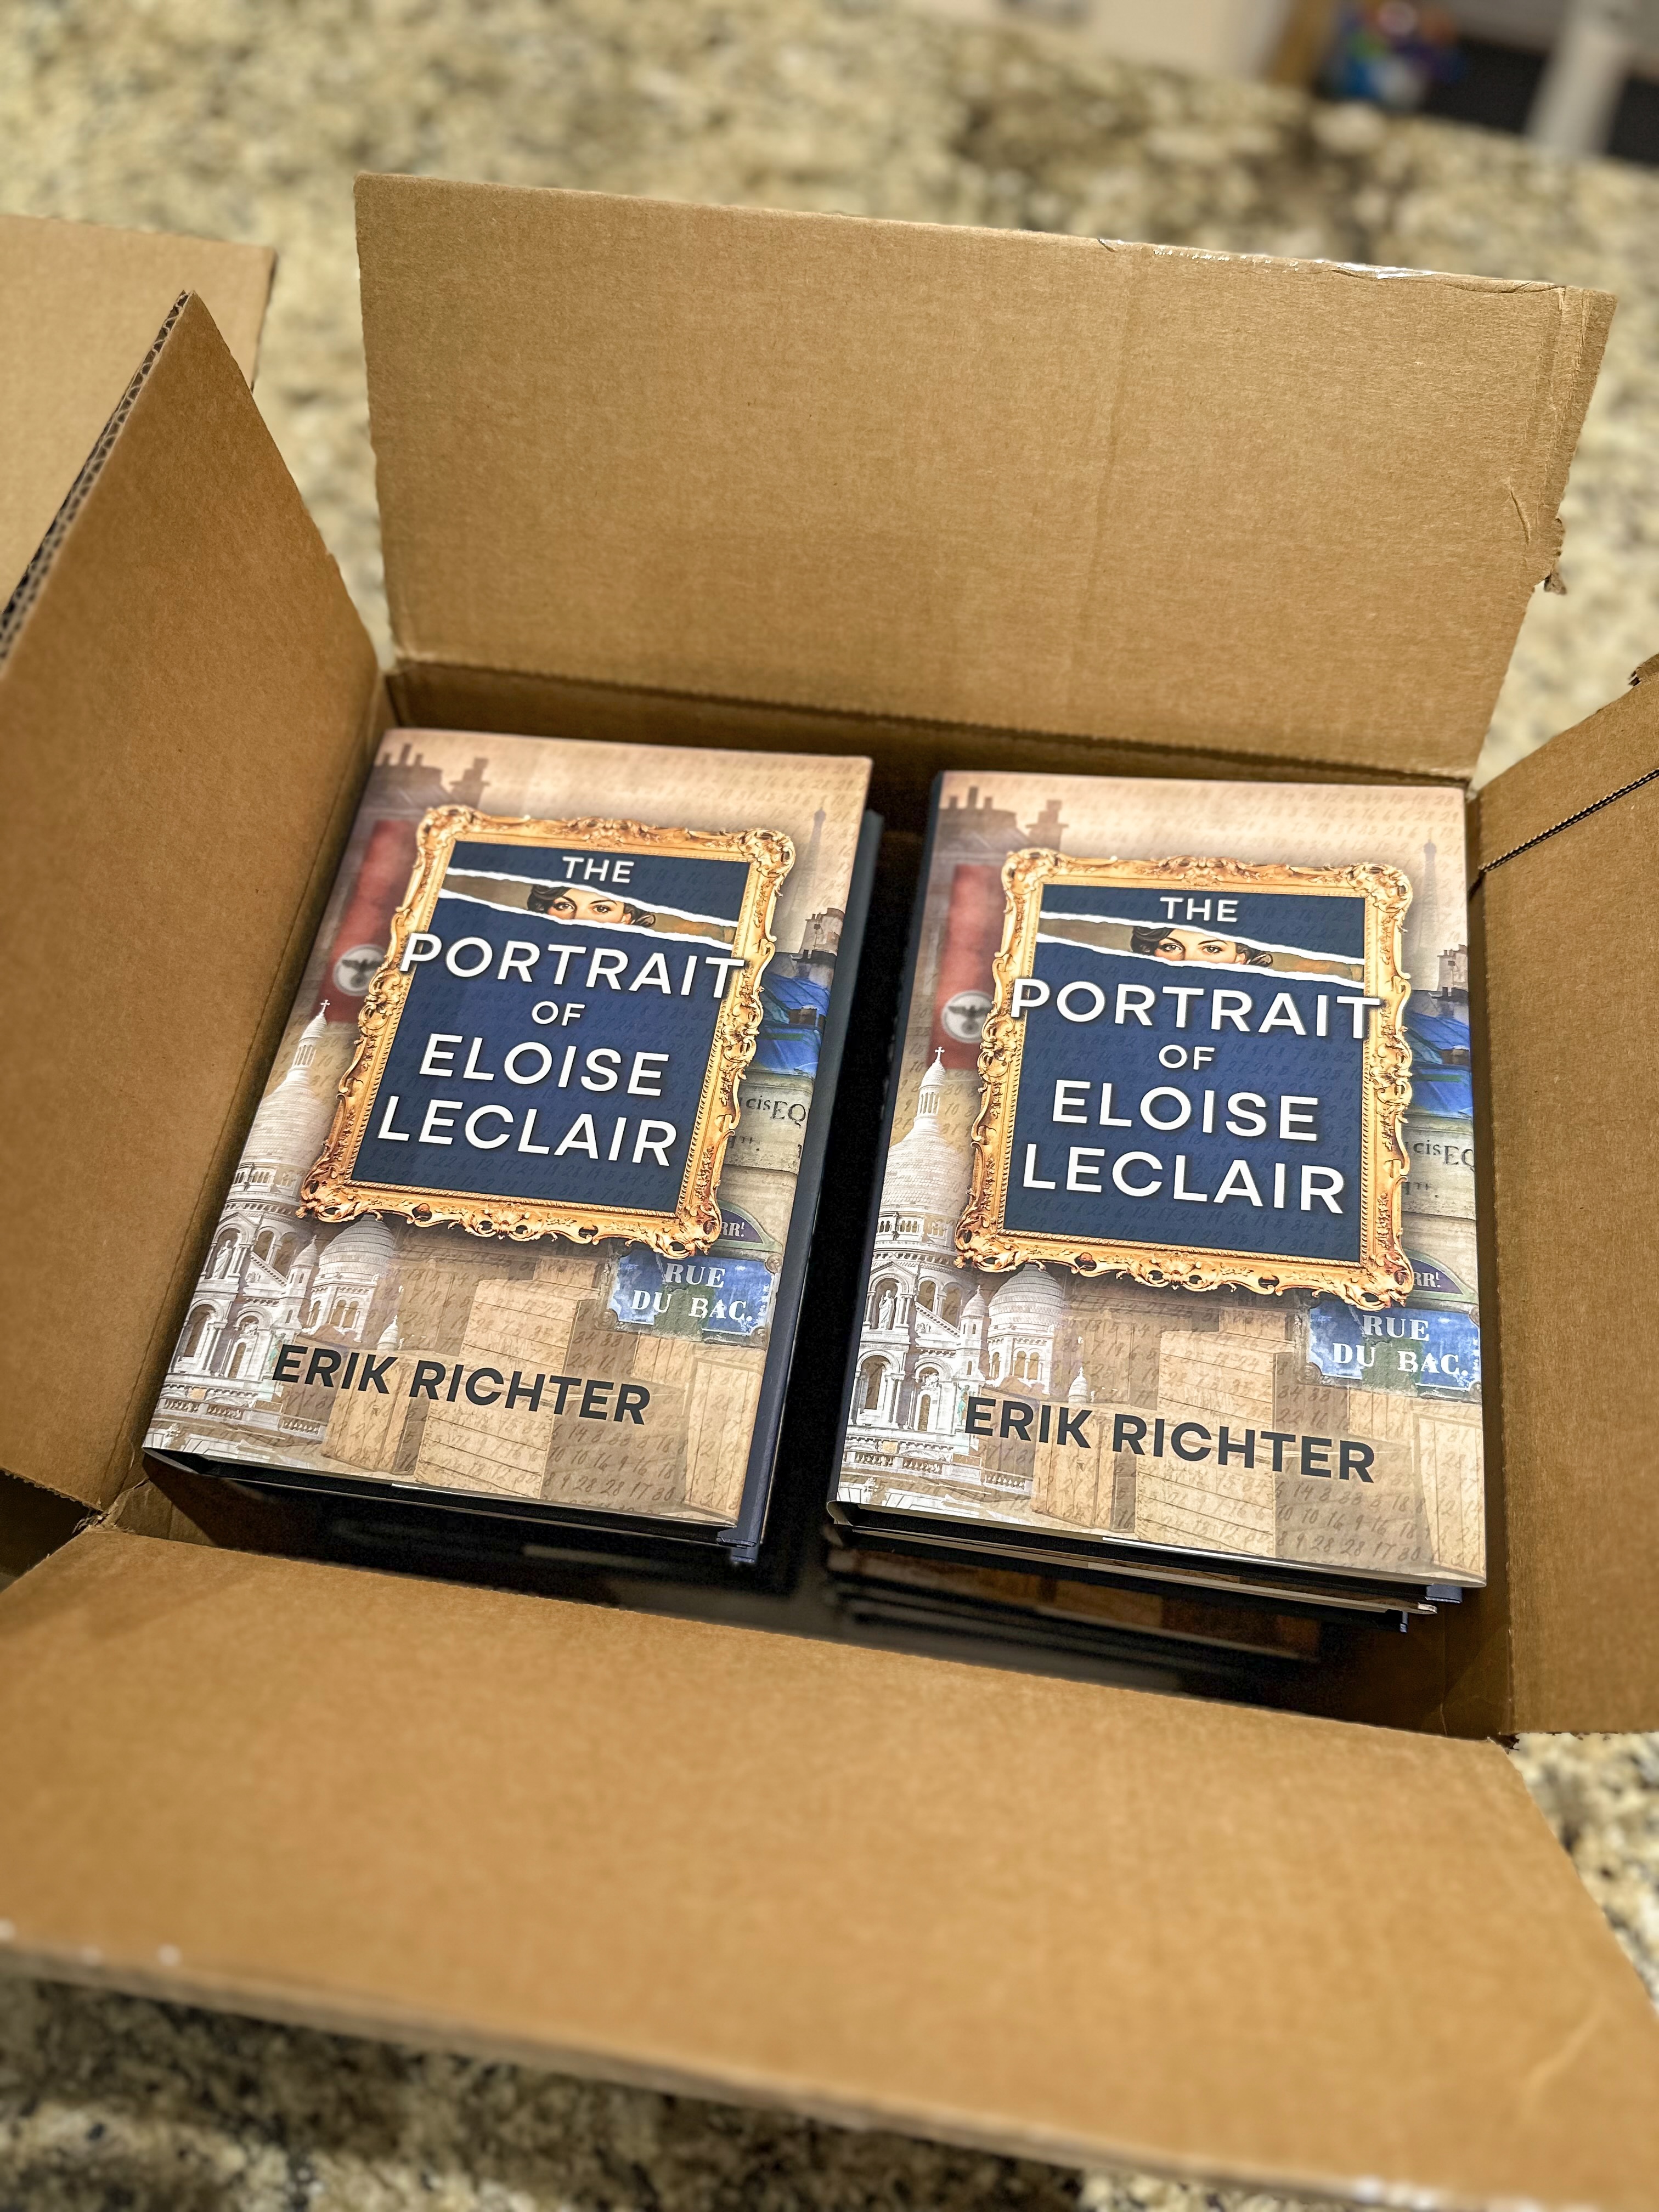
I placed an order for the first round of hardcover preorders through IngramSpark, printed at cost. I chose to only offer hardcovers for preorder because I wanted the unboxing to feel premium. This wasn’t just a book. It was a gift.
And that’s how I treated it.
Remember when I said I wanted to create an experience?
I drew inspiration from everything I love about opening something that feels personal and curated. Apple packaging. Hand-wrapped Etsy gifts. Tactile nostalgia. So I decided to package every single preorder like a historical artifact.
Each book I sold was (and still is):
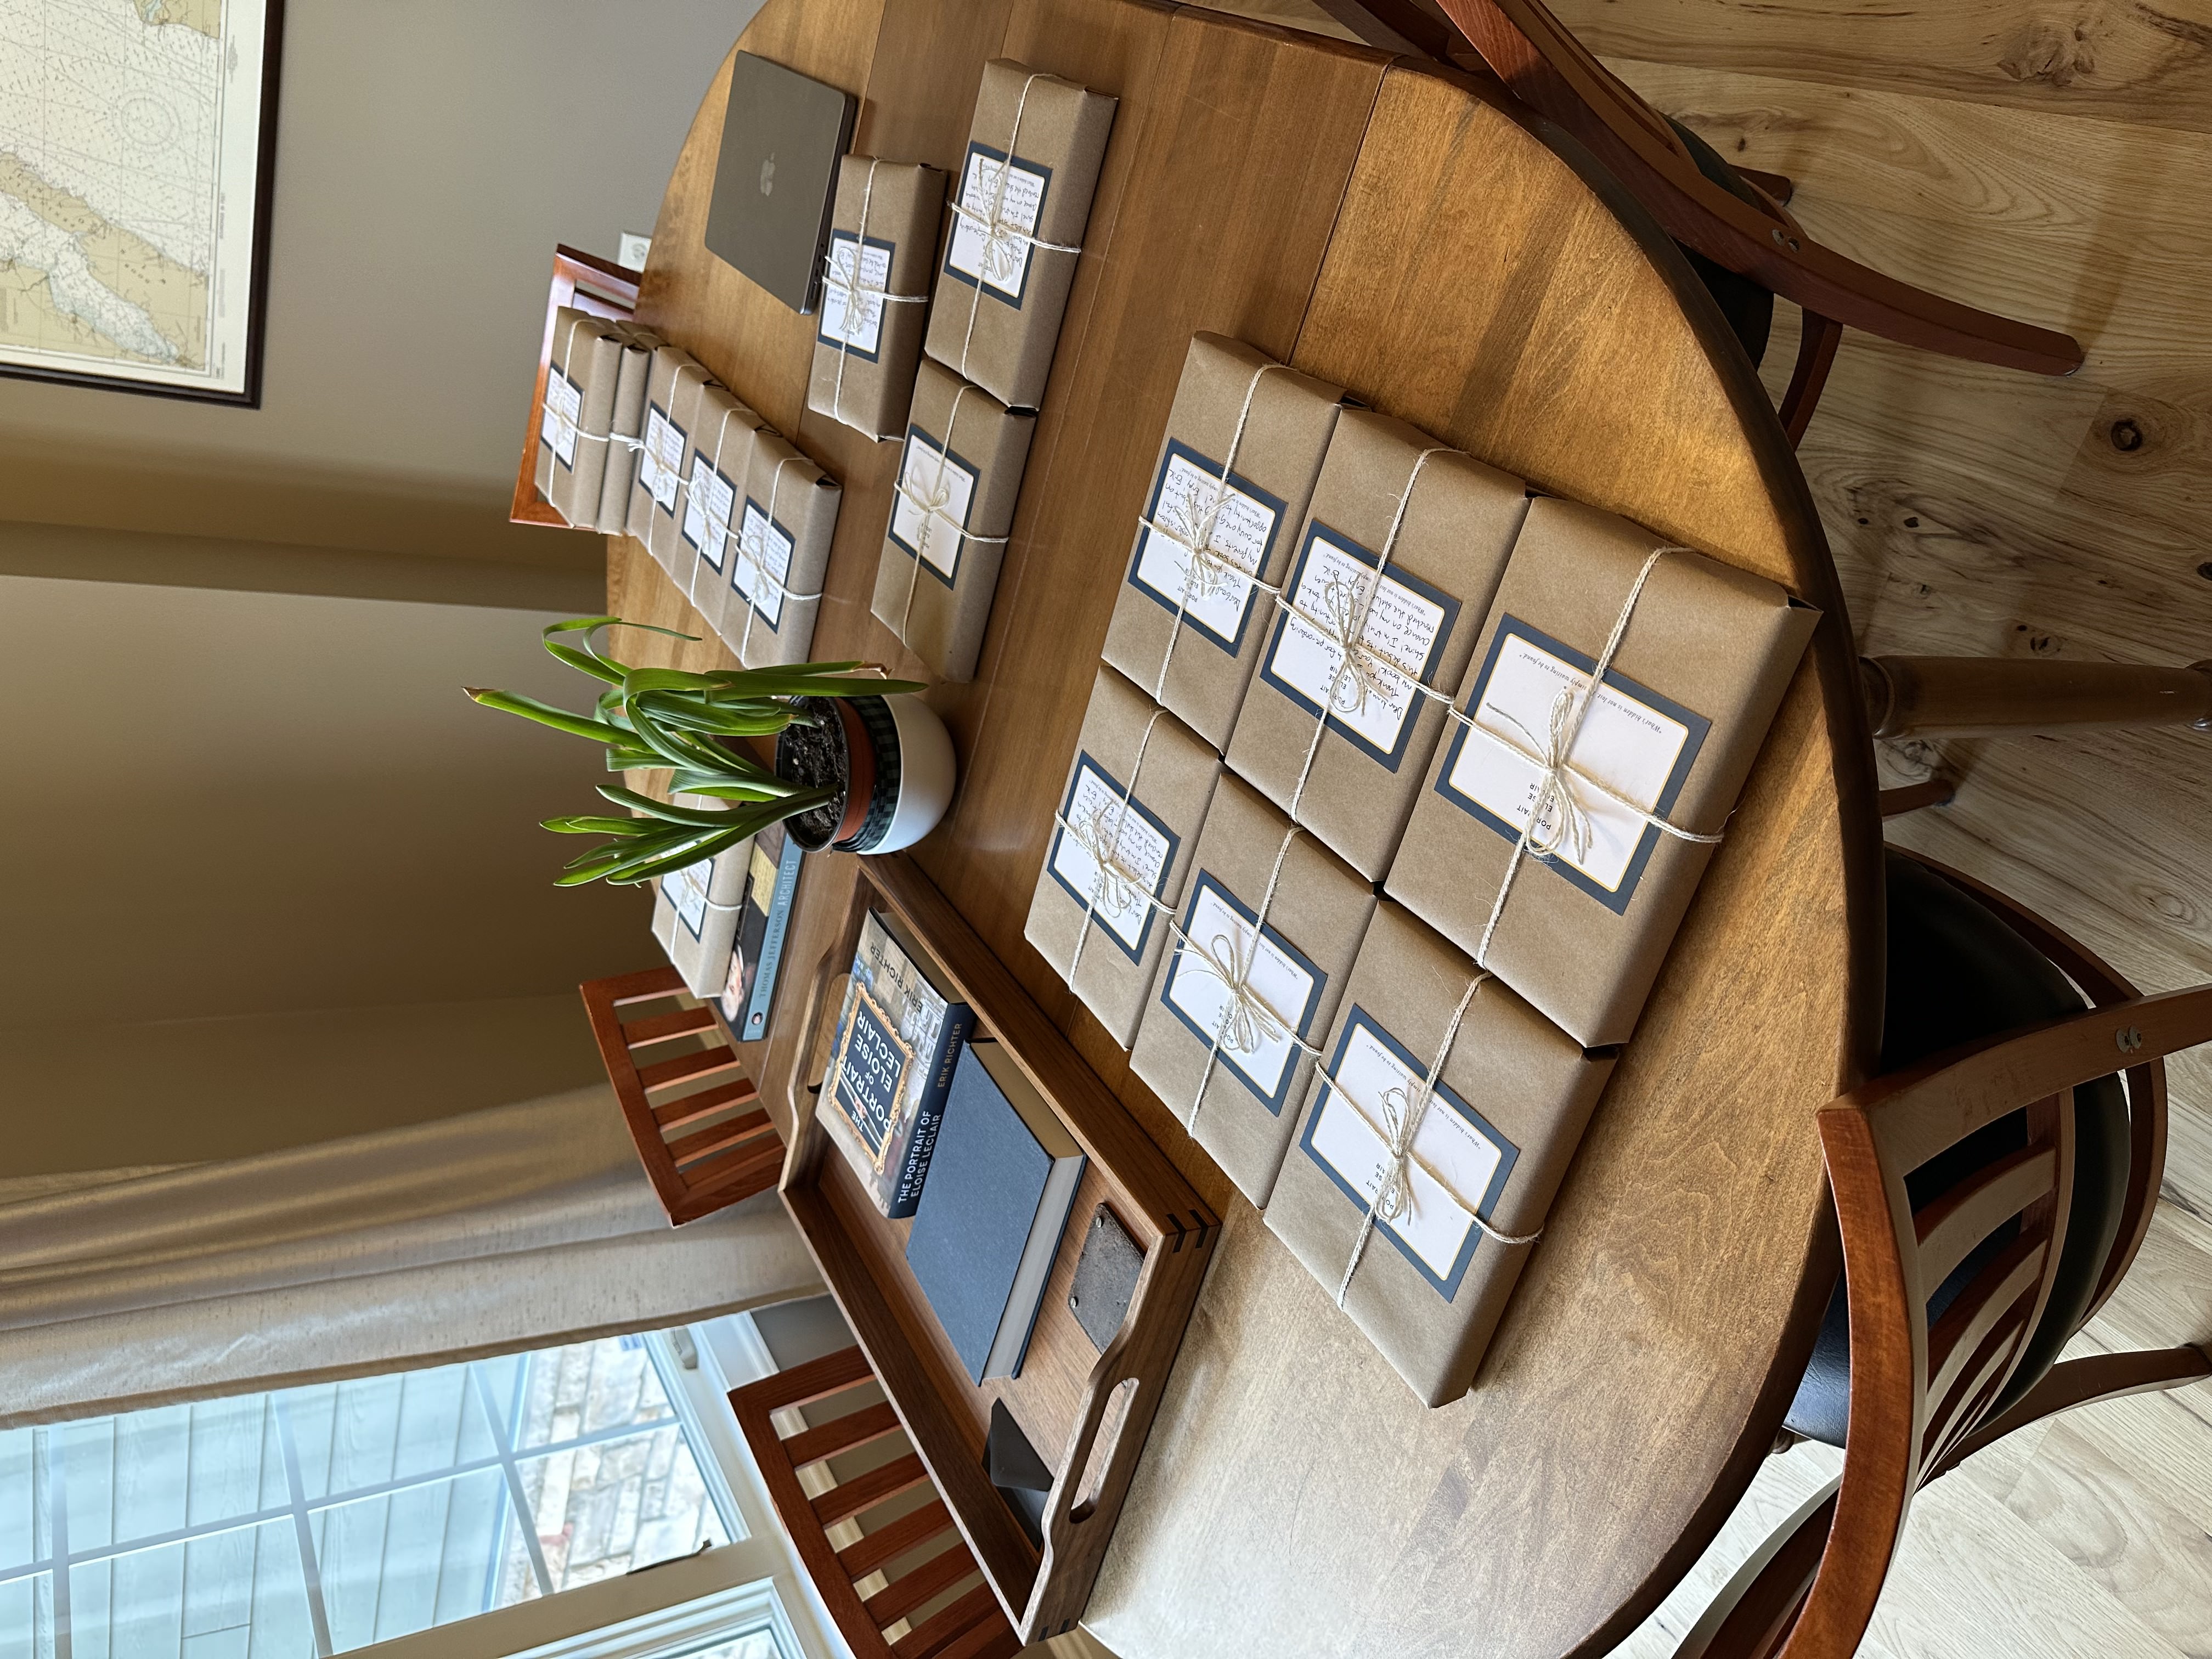
It was extra. And yes, it took time. But when you’re asking someone to spend $36 on your debut novel, the least you can do is make it feel like they’re unwrapping something special.
This was the kind of packaging that made people post about it. It generated word-of-mouth. It made the book feel less like a self-published gamble and more like a collector’s item.
Also: it was fun.
I used Media Mail through USPS, which saved me a ton on postage costs. It’s slower, but for books, it’s unbeatable price-wise… and I was upfront with readers about delivery timelines.
Every package had a hand-printed label. Every book was checked, wrapped, and checked again before heading out. I was basically running a one-man fulfillment warehouse from my dining room table.
But I loved it. Because for the first time, I could see the book leave my hands and go to real readers. I wasn’t just watching numbers tick up on a dashboard. These were names. Notes. Stories.
People who were buying me, not just my book.
A few days after the first shipment landed, I started getting tagged in unboxing photos. Posts. DMs. Messages saying how much they loved the packaging. One person said it reminded them of their grandfather’s wartime journals. Another said they hadn’t been this excited to open a package since Christmas.
That’s the power of thoughtful presentation. It’s not just branding. It’s experience design.
In a world of drop-shipped everything and algorithm-approved sameness, I wanted to make something that felt personal, analog, and deeply intentional.
And I think I did.
Let’s just get this out of the way: I did not go through this whole process so I could become a content creator.
I didn’t dream up dual-timelines, decode art clues, and polish 17 drafts so I could spend my afternoons workshopping Instagram captions. I wrote the book because I love storytelling. Because I had something I wanted to say about art and legacy and the way history sticks to us like fingerprints.
But in the world of self-publishing, you don’t get to just write. You have to sell. And that’s where things got… uncomfortable.
Here’s the truth: the vulnerability doesn’t end when you type “The End.”
If anything, it gets worse.
After months of pouring yourself into something deeply personal, you now have to shout about it from rooftops, write perky social media posts, and hope people click the link in your bio.
It’s weird. And if you’re even a little introverted (hi), it feels like tap dancing in public without knowing the steps.
I started to feel “sleazy-used-car-salesman-y.” I felt like I was just spamming my followers’ feeds.
It was a struggle.
All I wanted to do was write… to get lost in the quiet, creative hours with my coffee (or bourbon), rearranging paragraphs, fine-tuning scenes, falling in love with fictional people. Creating suspense, codes, hidden treasure hunts.
But then I open social and realize I have to market that world in 220 characters and a square image. And I just… can’t.
There was even one Instagram campaign I thought would go viral. Spent an afternoon designing it. Zero traction. Crickets. I deleted it after it made me feel embarrassingly visible. I questioned whether I had any marketing bones in me.
Poorly, at first (or maybe even still?). And reluctantly. But eventually, I found a rhythm that didn’t make me want to move into a cave.
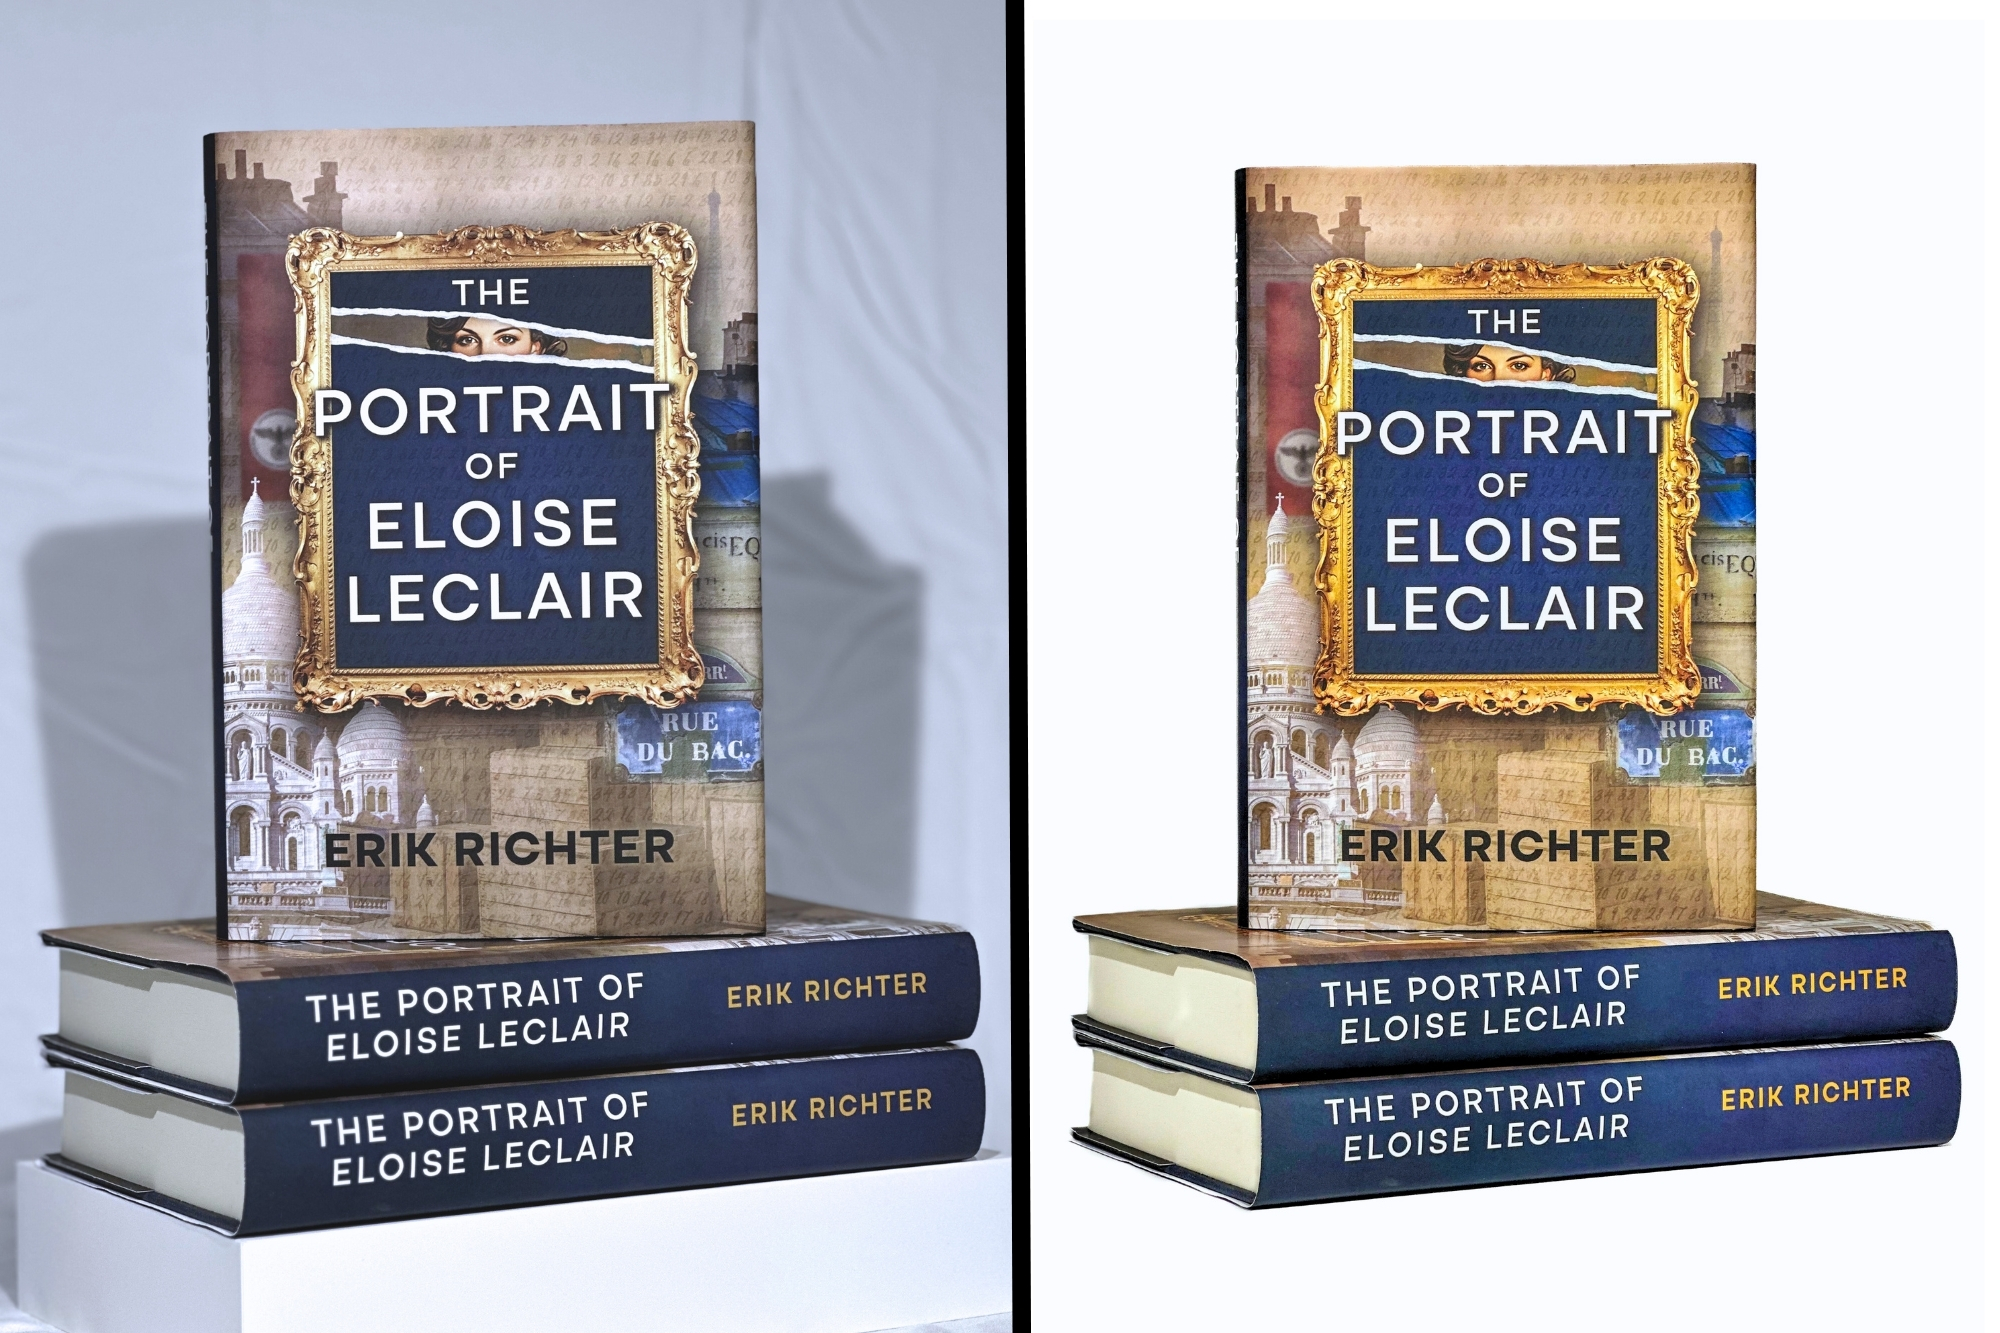
Before I could market anything, I needed something sexy to market. So as soon as my first proof copy landed, just before opening preorders, I staged an at-home photo shoot. Nothing glamorous... just a wrinkled white sheet, a couple of $60 Home Depot utility lights, and me pretending I knew what I was doing.
In my head, these photos were going to look like they came straight out of a glossy New York ad agency. In reality? They looked like Craigslist furniture listings.
The background was white, sure, but my bargain-bin lights turned the book a sickly shade of blue, and the cover was so underexposed it looked like a crime scene. Every wrinkle in the sheet screamed through the lens. Shadows abound.
Taking the shots was fine. What blindsided me was the editing. I sank hours into Lightroom, dragging sliders around like a DJ at 1 a.m., trying to make “dark and depressing” look like “moody and elegant.” Somehow, after enough caffeine and color correction, I wrestled the images into something usable.
And thank God, because those DIY shots ended up everywhere—preorder promos, launch graphics, ARC highlights, even the packaging inserts. Lesson learned: if you want your book to look serious, you have to make it look serious. Not boring. Not amateur. Just intentional. Sexy enough to stop a scroll.
Oo la la...


Laura also helped a ton here. She’s more comfortable promoting than I am, and she shared the book with her circles, many of whom preordered and posted about it. (Did I mention she’s the MVP of this whole journey?)
It’s not about “beating the algorithm.” It’s about being human, telling your story, and helping the right readers discover that your book is for them. 6 months in and over 1,000 copies later, I think I am still learning about this.
I wrote a book that lives in the uncomfortable space between genres.
It’s part historical fiction, part intellectual modern-day suspense. Literary in tone, but commercial in pacing. From a marketing standpoint, this is a nightmare. It means convincing two entirely different reader bases—those who love moody, atmospheric period pieces and those who crave high-stakes thrills—to trust that somehow, this one book will give them both what they’re looking for.
It’s not easy. It’s a pitch that makes bookstore owners tilt their heads and ask, “Wait, so what shelf does this go on?”
But here’s the thing:
I didn’t write this book to fit cleanly into a category. I wrote the kind of story I wanted to read. One that blends timelines. One that lets art shine. One that balances character and plot, emotion and clever puzzles, quiet moments and explosive suspense.
And if I keep telling that story, then maybe I have a shot at finding the readers it’s meant for (or better yet, they find me).
That’s how I know I’ve done my job.
I don’t have to post every day. I just have to show up consistently in a way that feels true to my voice.
And if you truly, deeply hate the social component, find someone who doesn’t. (Thanks, Laura.)
Marketing isn’t glamorous. It isn’t fun. It doesn’t feel natural.
But it works.
And it reminds me that publishing a book is more than writing. It’s inviting.
Inviting someone into the world you built, and giving them a reason to say yes.
After months of outlining, writing, rewriting, designing, formatting, shipping, and fighting with Amazon (politely)… it happened.
Launch day.
But here’s the thing no one tells you: launch day isn’t a fireworks moment. There’s no confetti cannon. No parade of readers. There’s no little man from Amazon who shows up with a party hat and says, “Congratulations, you’re published now.”
Launch day feels… quiet.
Unless you make it not quiet.
So that’s what I tried to do.

In the weeks leading up to launch, I had prepped well.
The packaging process became my favorite ritual.
I’d created this thing out of thin air, and now I was wrapping it like a museum artifact and sending it to a stranger who said, “Yes, I want to read what you made.” That’s surreal.
I celebrated that. I posted about that. THAT is what was important to me.
If you release your book on Amazon with zero reviews, you’re kinda dead in the water. That’s why I quietly released my paperback ahead of my official launch. Just so ARC readers could leave honest reviews before launch day hit.
This way:
Was it a loophole? Maybe.
Was it smart? Absolutely.
Most of my meaningful sales didn’t (and still don’t) come from Amazon.
They come from:
And because I’m not paying a 55% wholesale discount to anyone else, I actually make something on each sale.
I’m not in this for the money... anyone who thinks they’ll get rich on $2 a book should probably close their laptop now. But let’s be real... making a little money along the way doesn’t hurt.
And here’s another truth: Barnes & Noble probably isn’t picking up your book. Not unless you’re already moving serious numbers or have a full PR machine behind you.
But you know who might? Your local indie. Your neighborhood gift shop. Your friend’s book club.

You don’t build a career on those early $2 Amazon payouts. You build it by sharing a story you believe in. By driving direct sales and engaging your local community. You do it by giving readers a reason to care.
That’s why I invest in presentation. That’s why I customize every single shipment. That's why I love doing author talks. That’s why I show up on social media even when it makes me cringe.
The book doesn’t sell itself. I sell the book.
And the best thing I can do to sell more of it?
Write the next one.
Above everything else, that’s the one things I hear on repeat from Reddit threads, veteran indie authors, and every scrappy publishing podcast in existence:
Write the next one.
And I am.
Because I believe in this story.
Because I’ve fallen in love with these characters.
Because I want to keep going.
So I write. Late at night, after the kids are asleep. Bourbon nearby. Mind buzzing.
If you’ve read this far—if you’ve read the book—thank you.
Seriously.
Whether you’re a writer, a reader, a self-publishing nerd, or just someone who loves stories about stories, I’d love to hear from you. Reach out.
Let’s trade bookmarks.
Let’s swap battle stories.
Let’s help each other get our books into the world… one carefully wrapped, twine-tied package at a time.
You can grab your copy of my book at ThePortraitOfEloiseLeclair.com
Thanks again for reading.
Now go write something great!

